

Elysian | pronouncination: i-’li-zhen | Adjective; Blissful, Delightful; often describes a blissful state.
Want to know a couple more things that are delightful? Free crochet patterns and simple pieces that sell like hotcakes at markets and craft fairs. Done and Done, my crochet friends. I hope you’re entering a blissful state, because I’m dropping the easy crochet pattern for the AJK Elysian Wall Hanging here today!

Take a gander at that crazy good texture. The blissful combination of slanted puff stitches and the magic of tubular knit yarn combine to create that amazingly squishy, scrumptiously textured yet perfectly minimal look.
Hold up— tubular knit yarn, you say? I promise you’ve seen it before! This ultra-soft and squishy yarn is made in a chainette-style tube of soft jersey, and usually has a bit of stuffing inside. The chainette outsides and fluffy insides create insanely good stitch definition and super fluffy puff stitches! And because I’ve got crafty friends in so many different areas, I’ve worked up this gorgeous wall art in THREE different brands of yarn, so hopefully you can find or order one to whip up your own!
Probably the most popular of the three yarns is Bernat Maker Home Dec, which this boho chic, beautifully-minimal cream wall hanging is worked up with:

You can find Bernat Maker Home Dec in many craft stores, or on Amazon here: https://amzn.to/2w8DnDc .
This fantastic coral Elysian Wall Hanging is created in Red Heart Strata, which is almost identical to the Bernat Maker Home Dec:

Red Heart Strata is also found in many craft stores, some Walmart stores, or I found this three-pack for a great price on Amazon (you can make two full-sized wall hangings or three slightly smaller ones with this bulk three pack! Talk about a craft market SCORE!).
You can grab the three pack in coral on Amazon here: https://amzn.to/2SIaqpp .
The third option I’ve made the wall hanging in is Loops ‘n Threads Woolike CHUNKY, usually found at Michael’s craft stores. It’s a similar tubular knit yarn in really pretty colors that creates a gorgeous piece!

Let’s get started!
You’ll need:
Size 5 bulky yarn, preferably Bernat Maker Home Dec (317 yds/skein) or Red Heart Strata 95 yds/skein), approximately 100-110 yards. I can make two Elysian wall hangings with fringe using three skeins of Red Heart Strata.
Size 6.0 / J crochet hook. I’m using my beautiful Furls Crochet Candy Shop hook in the tutorial video! Shop for your own luxury Furls hooks HERE:
A rustic stick from your backyard or favorite hiking trail, or dowel rod (for the not-so-outdoorsy)
scissors and yarn/tapestry needle
A note before you begin:
Be sure to crochet your initial foundation chains LOOSELY! Don’t be worried if your chain looks short for the size wall hanging we are creating in the pattern; the jersey knit yarn will stretch a good amount, and your rows will end up much longer than the initial chain! You want to create a loose foundation for the puff stitches to have plenty of room.
When working the SPS, or Slanted Puff Stitch, make sure to pull the loop up to the height of the DC stitch in front of it to ensure your puff stitch has lots of “puff”! If you’re not familiar with this stitch, or you’re a visual learner, I’ve created a detailed video tutorial for you, as well as a step-by-step picture tutorial you can find below. If you’re like me and prefer to work from standard crochet patterns, just scroll to the bottom of this post.

The Slanted Puff Stitch is created using a multiple of three stitches, plus an additional three stitches as a turning chain. If you’d like to make your wallhanging smaller or larger (go big with this one! It’s gorgeous!), simply increase your starting chain to a multiple of 3.
With your 6.0 / J hook, chain 21 sts LOOSELY. Like… l o o s e l y. If you’re unsure if you are a tight crocheter, or just want to know what my definition of “loose” is, watch Part 1 of the tutorial video to see what I mean!
Next, place a DC into the fourth chain from your hook:
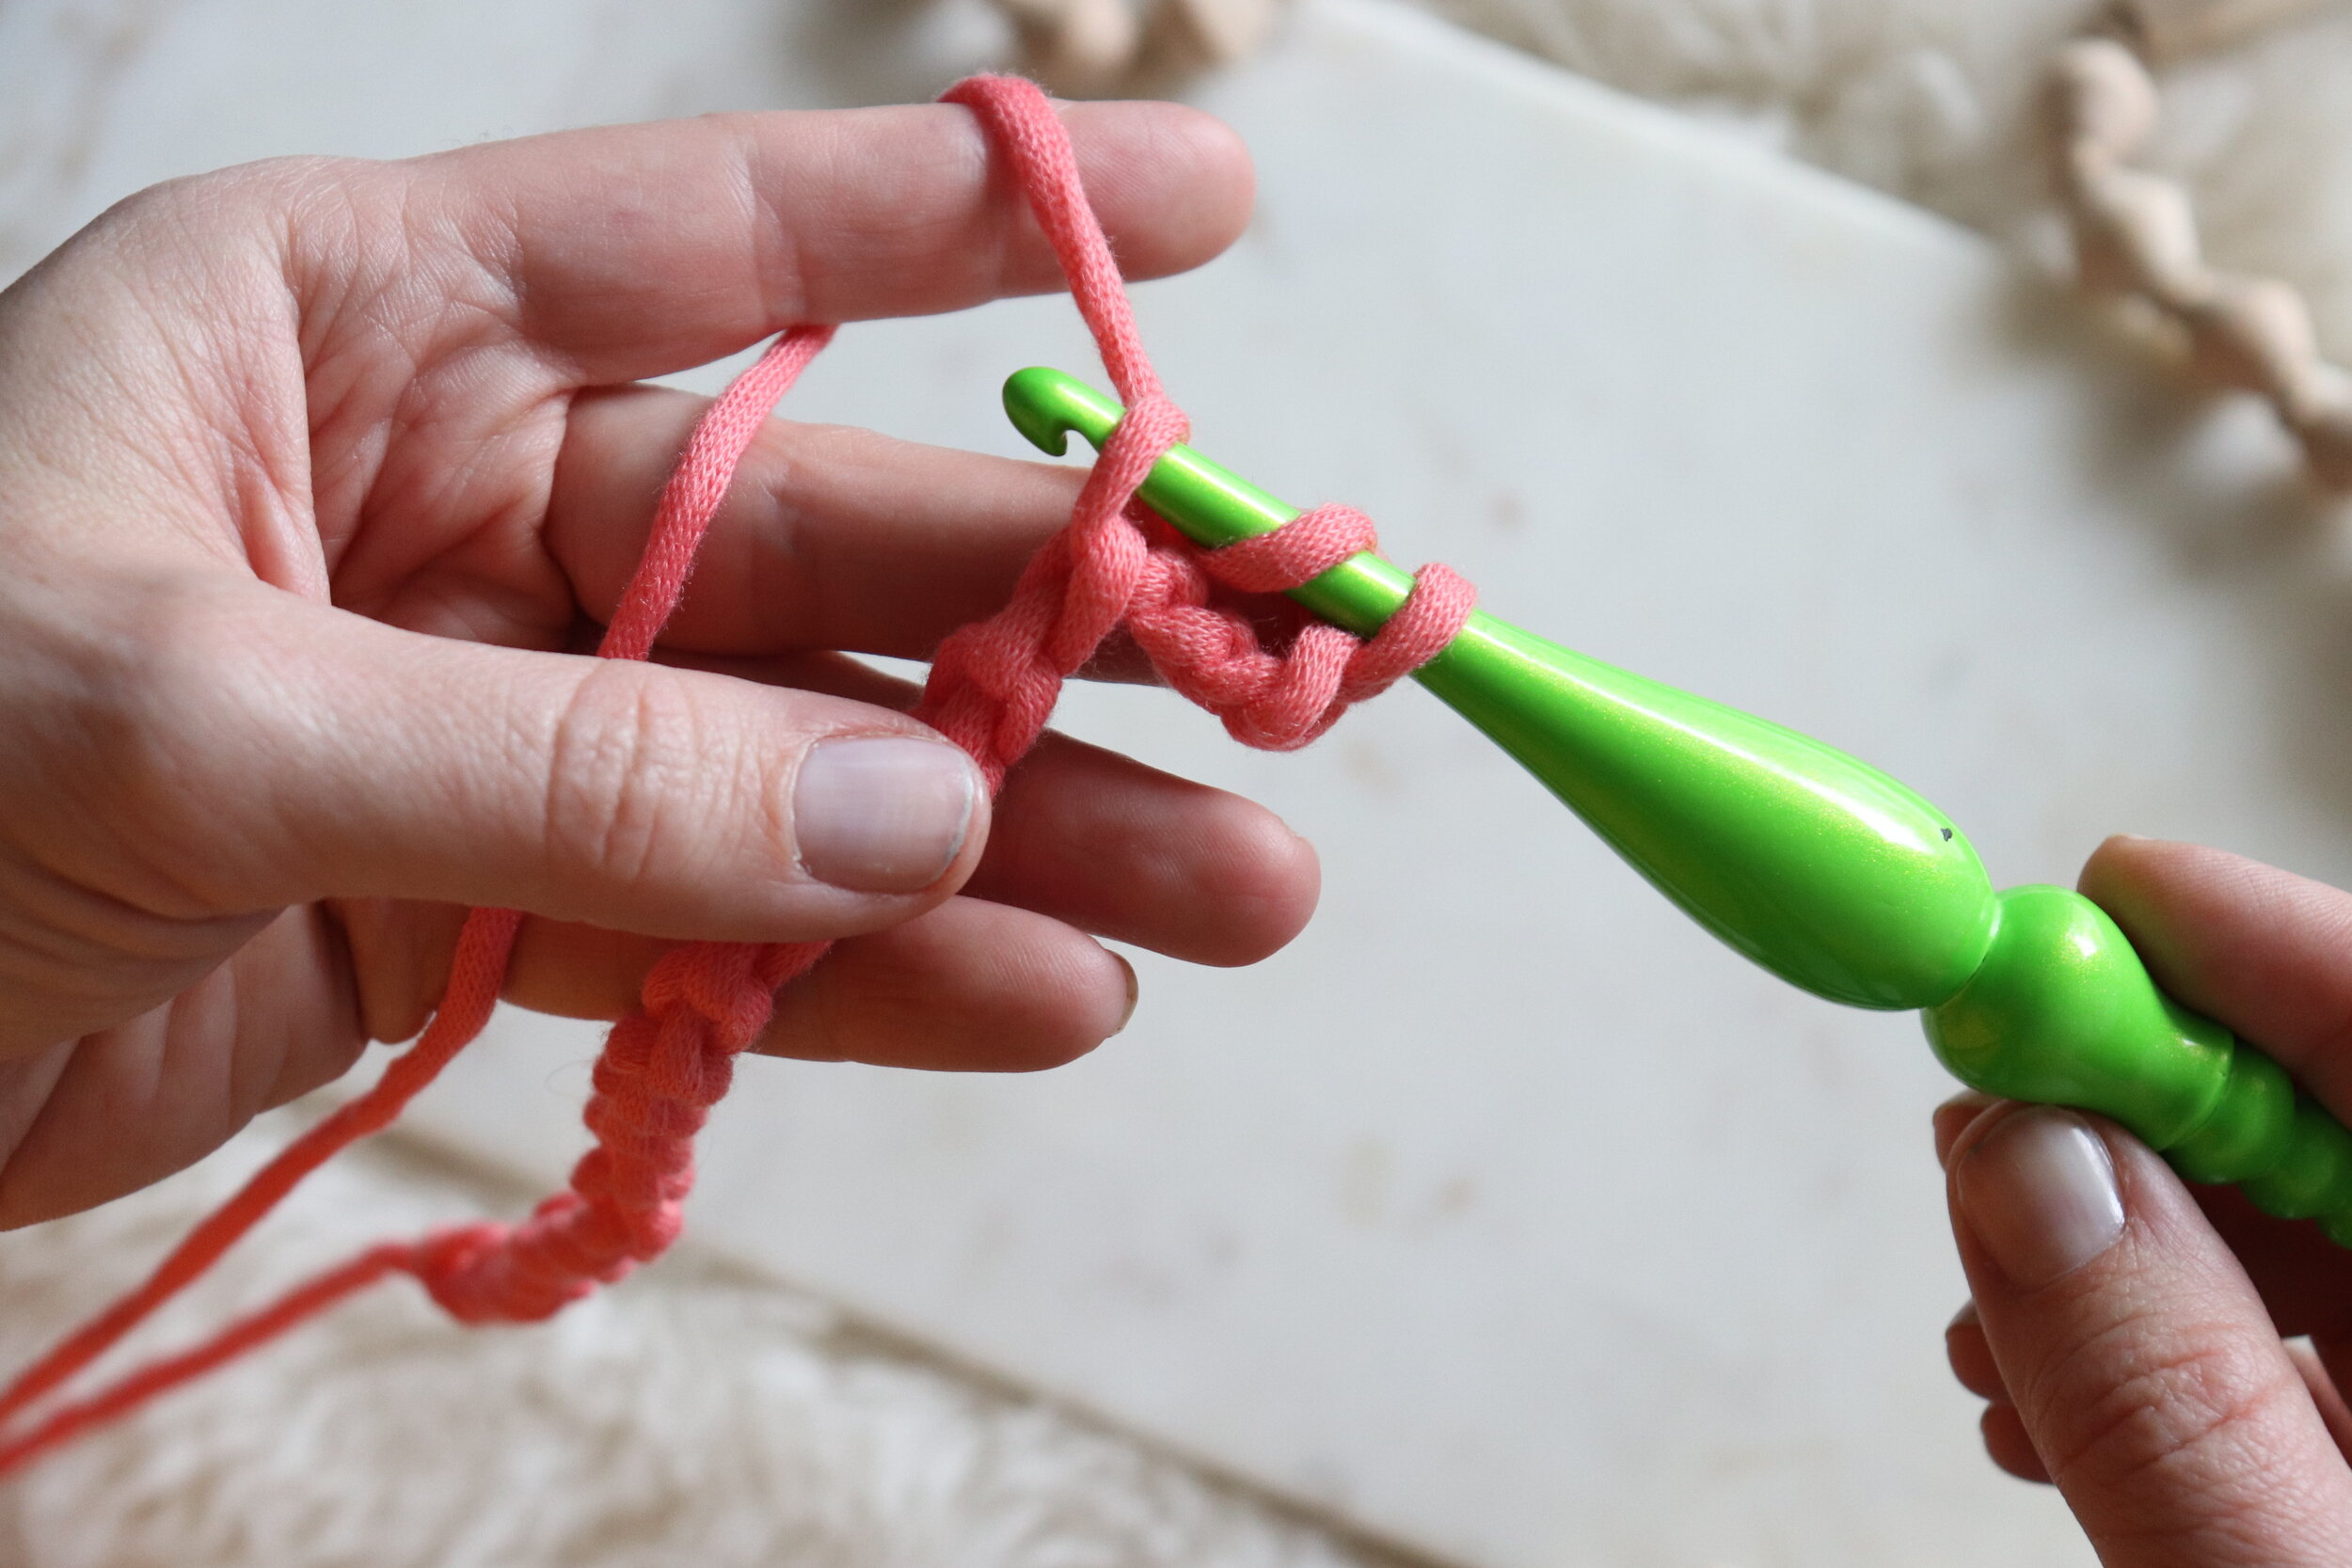
Now, yarn over (YO) and pull up a loop in the third chain from your hook, right behind the DC you just created. The DC acts as the “stuffing” that you’ll create your Slanted Puff Stitch around. Pull it up TALL (3 loops on hook):

YO, and insert your hook back into that same chain you just pulled a loop up in, pulling it up to the height of the DC as before (5 loops on hook). Now YO and insert into the same chain one more time for a total of three times. You will have 7 loops on your hook:

YO and pull loop through all seven loops on your hook. Chain 1 to secure your Slanted Puff Stitch (SPS). Voila! Congrats on birthing your first little puff stitch! (she’s so cute):

Skip the next chain, and place a DC in the next chain after the skipped stitch:

Just like before, locate the skipped stitch right behind the DC you just created. YO and pull up a loop in that stitch (3 loops on hook)—remember to pull it up TALL:

YO, pull up a loop in that same stitch (5 sts on hook). YO and pull up the final loop (7 sts on hook). YO and pull through all seven stitches, ch 1 to secure.
You did it! Your two little baby puff stitches might look a tad messy, but keep going! The great thing about this wall hanging and the jersey knit yarn we use to create it is the TEXTURE, which also hides beginner mistakes and tension issues nicely.
Keep working across your foundation chain, skipping the stitch after your DC/puff stitch and placing a DC in the next stitch. Puff stitch around the DC, in the chain behind it, for a total of 9 puff stitches (using 18 foundation chains).
Place a half double crochet (HDC) stitch in the final chain, ch 2. Turn your work.
Ready for the second row? Locate your ch 1 stitch that you used to secure your SPS in the puff stitch below on row 1. If you’re unsure of which stitch this is, watch my video tutorial to see exactly how to find it!

DC in the ch 1 stitch from Row 1:

Just like before, locate the stitch behind the DC you just made. YO and pull up a TALL loop in this stitch:

YO and pull up a loop (5 sts on hook), YO and pull up a final TALL loop (7 sts on hook). YO, pull through all seven stitches, ch 1 to secure:

First Slanted Puff stitch for your second row DONE!
Place a DC in the ch 1 st from the next puff stitch in Row 1:

Locate the stitch behind the DC you just created.
YO, pull up a TALL loop. Repeat 2 more times (7 loops on hook). YO, pull through all seven loops, ch 1.

Continue to DC/Puff stitch across the row, HDC in top of ch 2 from the row before. Ch 2, turn.
You’ve got the pattern down now! Keep going just like this, in this same pattern, for a total of 18 rows. Make sure you always have nine puff stitches in each row!
HINT: I like to s t r e t c h the work out after completing each row to help the stitches settle and keep the edges from pulling.
After you’ve completed 18 rows of Slanted Puff stitches, evenly sc around all four sides of the wall hanging. See the picture below, and check out Part 2 of the video tutorial for a closer look! After you’ve sc around, tie off and leave a LONG tail for attaching to your stick or dowel rod.
Cut 21 pieces of yarn for your fringe. It’s totally up to you how long you’d like your fringe to hang! I cut approximately 14” pieces, which you’ll double over and attach to the bottom of your wall hanging. Check out Part 2 of the video tutorial to see how I attach fringe!

Now it’s time to attach your beautiful work to a good stick! Thread a yarn needle with the long tail left over from your sc border. loop it around the stick and insert your needle through the sc at the edge of the wall hanging:

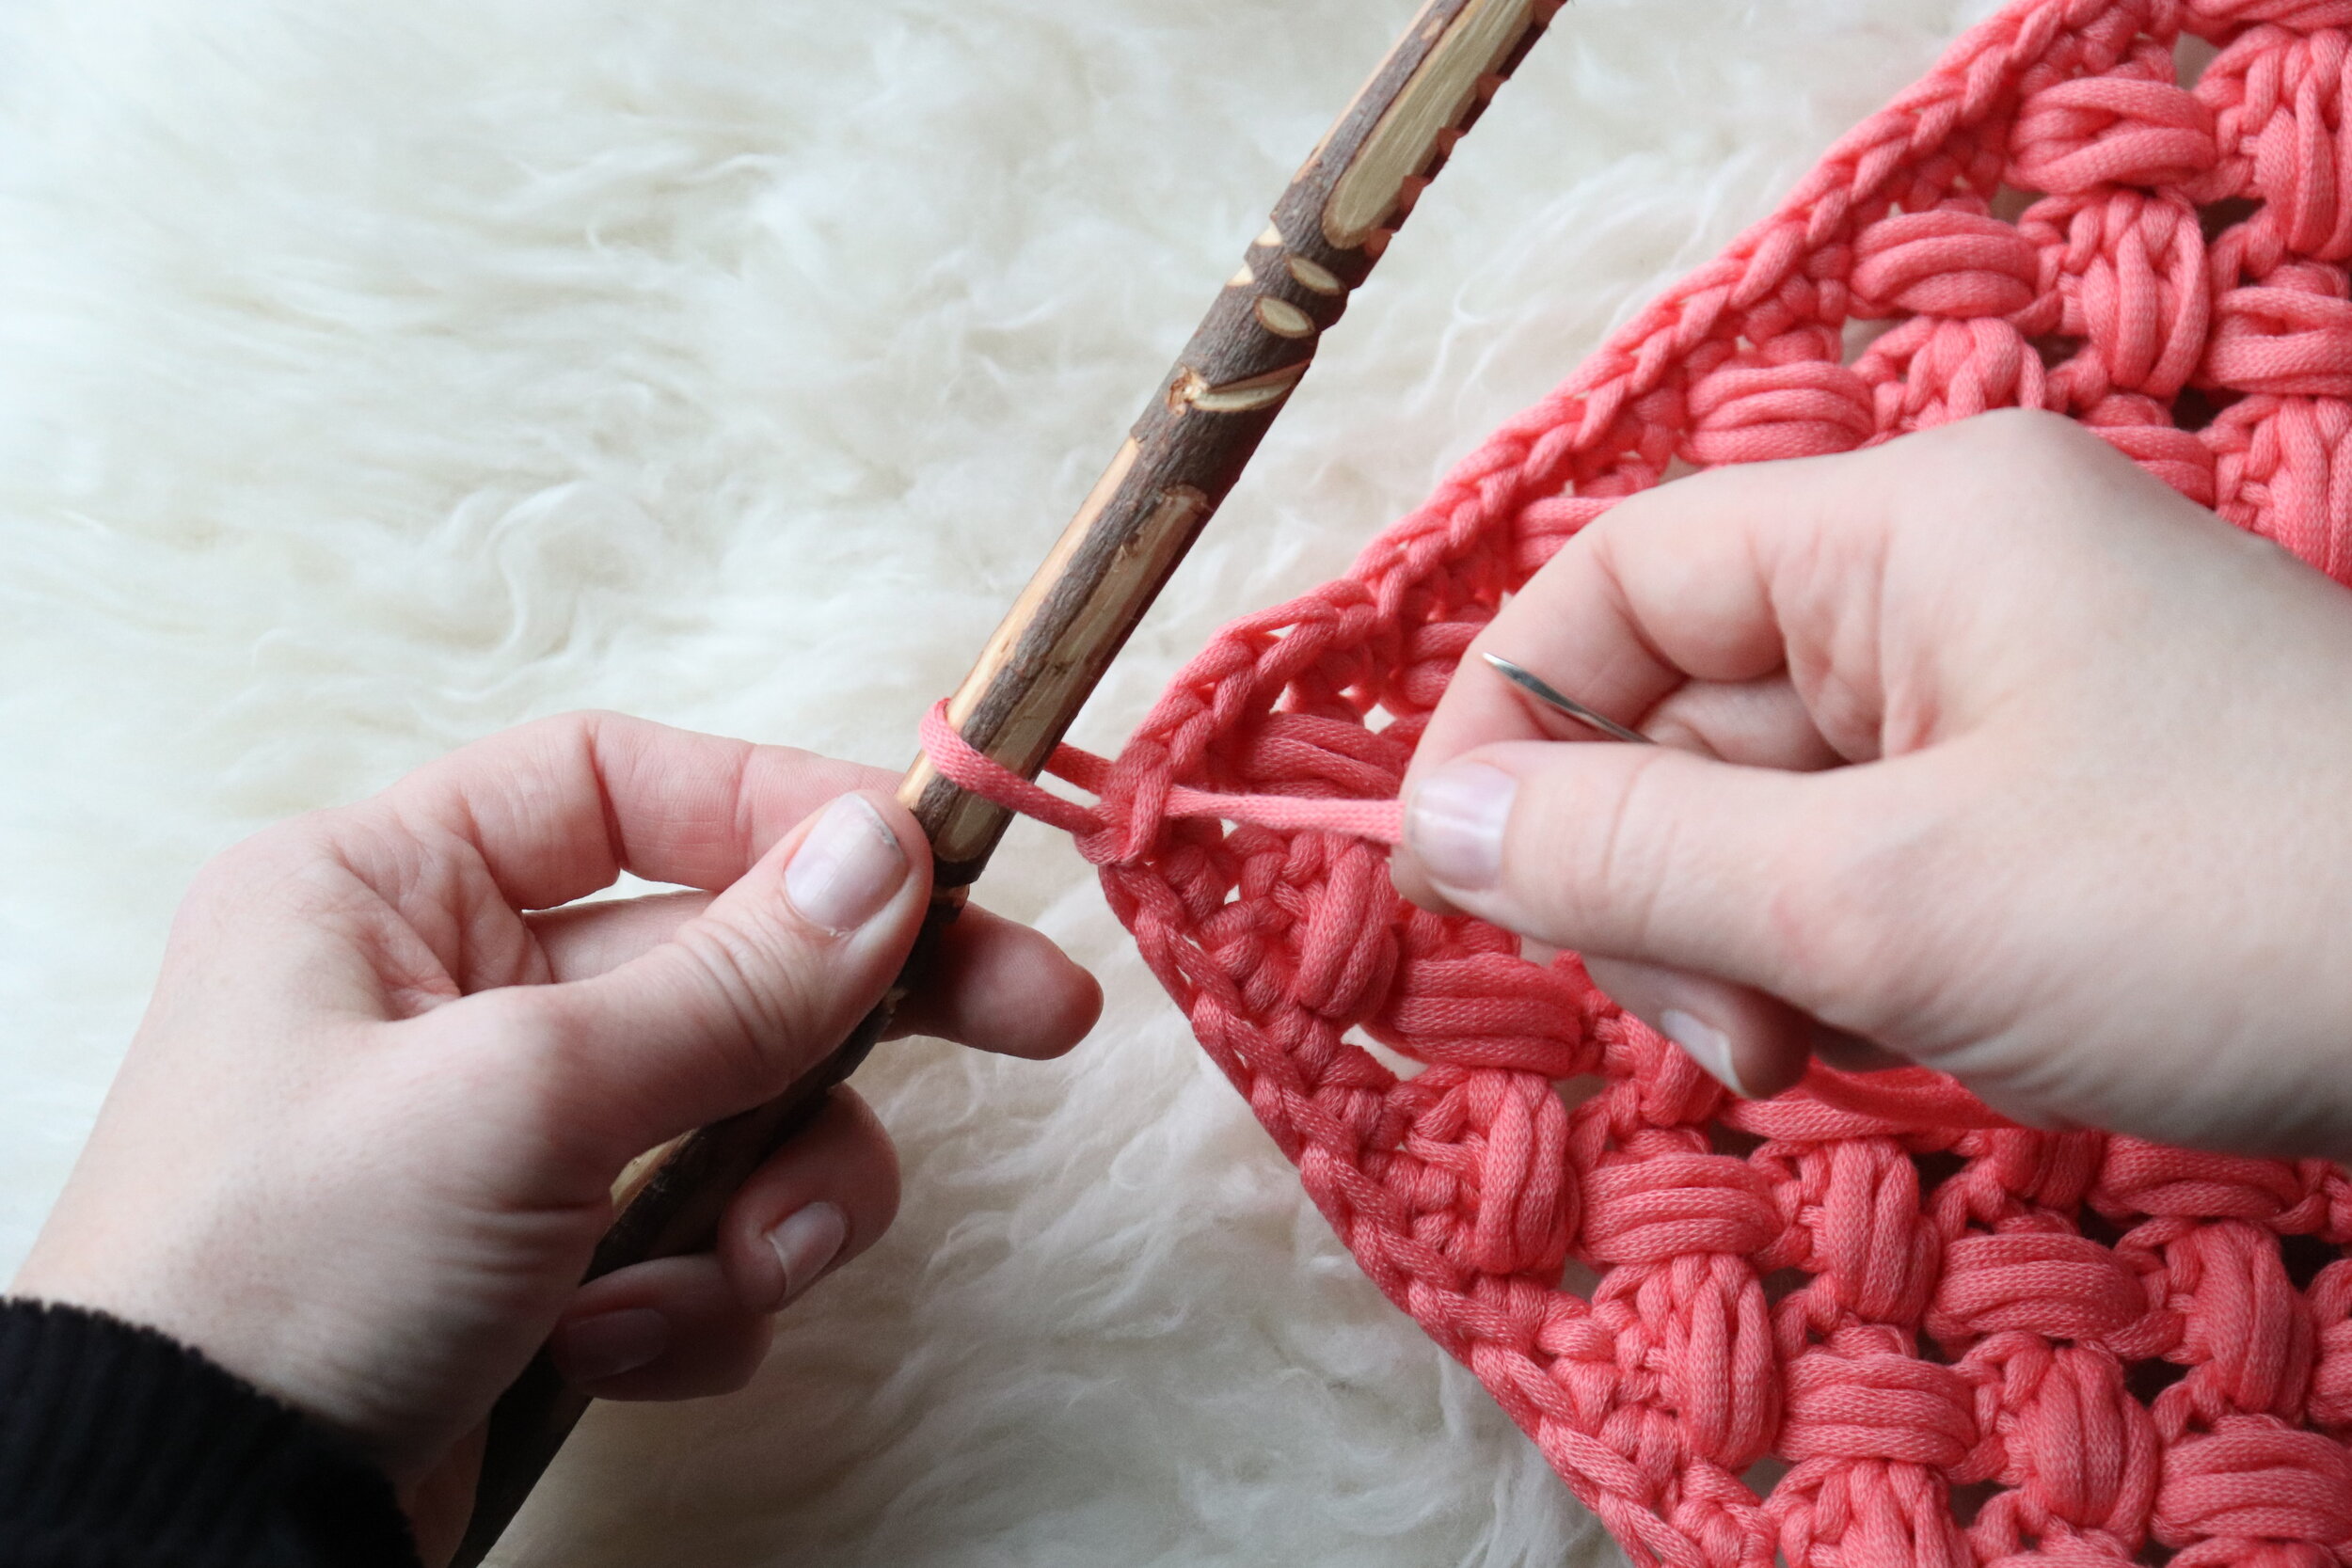
Pull yarn through, loop it around the stick and insert needle into the next sc at the top of the wall hanging.
You may prefer to skip every other sc, or even every three—it doesn’t really matter to the stability of the piece, so choose whatever you like best!

Continue across the wall hanging and tie off. Weave in your end (YAY for only one end to weave in!) at the back of the piece.

Simply decide how you’d like to hang your gorgeous Elysian, and you’re FINISHED! I like to tie a bit of the yarn to each end of the stick and hang from a nail. You could also hand the piece from the wood, balanced on two nails or pegs. Whatever fits your aesthetic!

For all you visual crocheters or beginners, you can find a complete video tutorial of the AJK Elysian Crochet Wall Hanging here:
Standard Crochet Pattern:
AJK Elysian Crochet Wall Hanging
Difficulty: Easy
Stitches used: ch, DC, SPS (slanted puff stitch), HDC, sc.
Special stitch: SPS - After creating DC, YO, insert hook into stitch directly to the right (behind) DC. Pull up a loop, making sure to pull loop up to height of DC (3 loops on hook). YO, insert hook into same stitch, pull up loop TALL (5 loops on hook). YO, pull up a final loop (7 loops on hook). YO and pull through all seven loops. Ch 1 to secure puff stitch.
Ch 21
Row 1: DC in 4th ch from hook. SPS in chain directly behind DC you just created(creating puff stitch around DC). Ch 1 to secure puff stitch. *Skip next chain, place DC in next chain. SPS in skipped ch behind DC you just created, ch 1 to secure. * Repeat from * across row for 9 total puff stitches. HDC in last chain. Ch 2, turn.
Row 2: DC in ch 1 stitch at top of puff stitch from Row 1. SPS in stitch directly behind DC you just created. Ch 1 to secure puff stitch. *Skip next st, place DC in following st. SPS in skipped st behind DC you just created, ch 1 to secure. * Repeat from * across row for 9 total puff stitches. HDC in last chain. Ch 2, turn.'
Row 3-18: Repeat Row 2. Do not fasten off after final HDC in row 18.
SC evenly around work. Fasten off, leaving extra long tail to attach to stick or dowel rod.
Using yarn needle, whip stitch around stick and into each sc at top of your work, securing the piece to the rod. You may prefer to skip every other sc, or even every three, it’s totally up to you!
Cut 21 pieces of yarn, approx. 14'“ long each (or longer, depending on your desired length of fringe) and attach each piece to the sc at bottom of wall hanging.
Voila! You’ve finished your gorgeous Elysian Crochet Wall Hanging!

And you’re done! Thank you for all the love you’ve shown the #ElysianCrochetWallhanging on Instagram, and please tag me when you’ve finished your own wall hanging! I am @addisonjamesknits on Instagram.
You can also contact me at addisonjamesknits@gmail.com with any questions you might have; remember to check out both video tutorials as well!
