Addison James Knits

Handmade Luxury for the Adventure.

Furls Blog Hop 2020 Free pattern: The AJK Solitude Pillow

Free Knitting PatternsRachael Jun1 Comment
AJKSolitude0.JPG
Furls Blog Hop 2020 fb banner 2.jpg

Welcome, blog hop Furlers (and soon-to-be-Furlers)! I’m so excited to host Furls FiberArts’ March blog hop pattern!

Introducing the AJK Solitude Pillow! (I had an insta-friend ask me if I named the pillow before or after the “social distancing” of coronavirus 2020…it was before, I swear!)

I love decorating my 70-year-old midcentury home, especially with minimalist-inspired pieces that speak to the simple, cozy nest I’m always trying to create and maintain for my little family. Two dogs, two kids, a military husband, a couple of careers…life gets insane sometimes, and usually I joke that I’m just hanging on by my chipped-polished nails, but I’m honestly not joking most of the time.

A few years ago, when we lived in a 42-foot RV for over a year after moving to Maryland, we adopted an intentionally-minimal mindset. Well…let’s say minimal-ish. We really try to focus on collecting experiences- as a family and as individuals- instead of collecting things. Now…I love a good TJ Maxx trip. Like, LOVE, do you hear me?! Especially for home decor. But as I learned more about what living minimal-ish means to my family (sometimes in a not-so-pretty way), I began to find joy in creating pieces for my home that I absolutely adored; handmade pieces that communicated the simple, clean, fresh feeling I wanted for my home.

I promise you, my house doesn’t look as pretty as the pictures all the time. Not even some of the time! It’s more like there’s probably a room or two that looks somewhat put together at one time…anyone else? (Hello, giant GoldenDoodle puppy). Having these pieces in my home that bring me so much joy, and that means so much to me because I made them with my own hands helps to pull my little spaces together in a way that feels clean and cozy (even when it’s not quite there).

AJKSolitude3.JPG

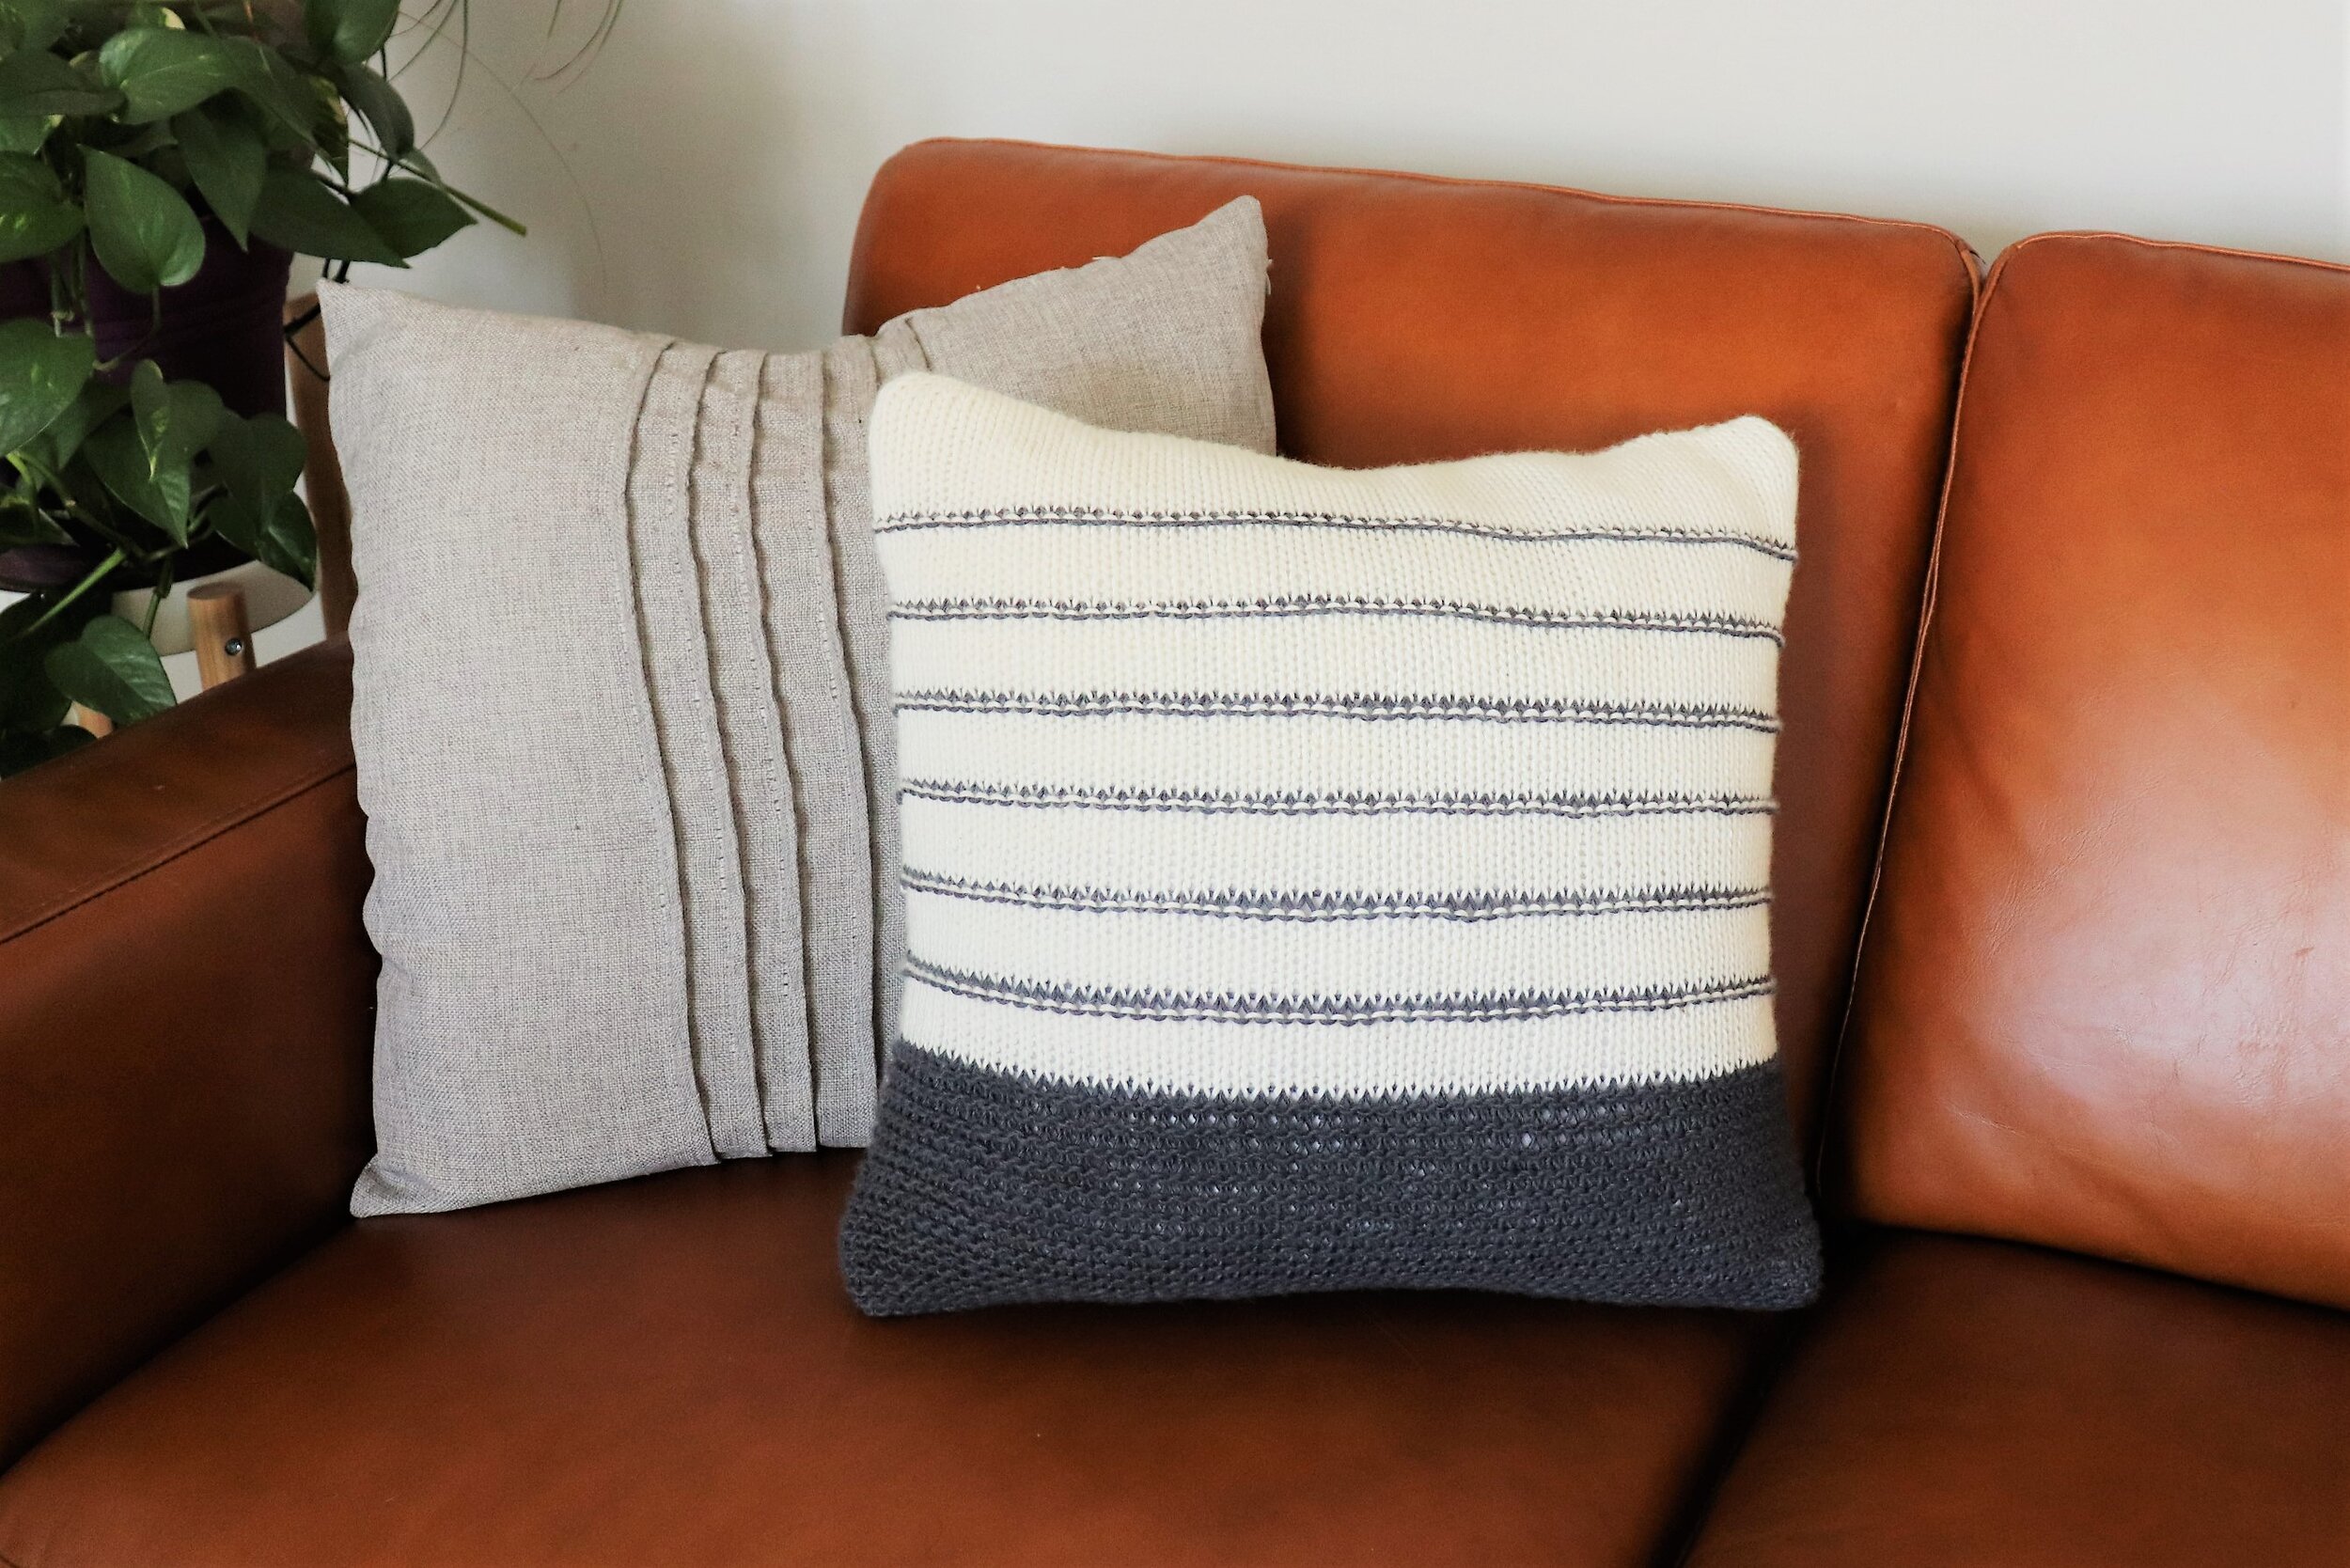
The AJK Solitude pillow is an easy level pattern, knit in the round on circular needles. The continuous construction of the body of the pillow creates the need for only two quick seams at the bottom and top of the piece! The pattern itself is straightforward and simple, and when knit up in the ultra-squishy and soft Furls Whims Merino yarn in worsted weight, it will fly off your needles faster than a season of Good Girls! (one of my knitflix faves!)

AJKSolitudeWIP7.jpg

Let’s get started!

You’ll need:

  • Approximately 250 yards of Size 4 worsted yarn in two colors, preferably Furls FiberArts’ Whims Merino Worsted (103 yds/94 m per skein). I used approximately 120 yards of each color ( 2 skeins of each color, Charcoal and White—find them here !

    There will be enough yarn left over to add tassels or fringe to customize your Solitude Pillow if you’d like!

  • Size 5.0 / circular knitting needles with your preference for cord length (at least 16”) . Furls will be debuting their gorgeous new line of circulars soon, so keep your eyes peeled here!

  • 18” X 18” or 20” X 20” pillow form. I prefer to use down or down alternative forms for a little “heft” to my sofa pillows!

    PRO TIP: You can also stuff your pillow with fiberfill stuffing! I recommend placing a clean pillowcase you no longer use inside the Solitude pillow once it’s knit up, like a liner, and then stuff your pillow with fiberfill! Simply flip down and tuck in the excess pillowcase once the Solitude pillow is full.

  • scissors and yarn/tapestry needle

  • stitch marker

A note before you begin:

  • The Solitude pillow is meant to be seamed on both the bottom and top of the pillow, so it will not be a removable cover for the pillow form. I actually just throw my handmade decorative pillows in the washing machine and dryer (with a wool dryer ball) and they have held up beautifully over the years, but if you would like to make your pillow removable from the form, you can attach buttons or even sew a zipper to the bound-off edge!

  • I highly recommend using the mattress stitch to seam the bottom and top of the pillow. It creates such a professional, polished look and is highly durable and helps the piece hold it’s shape. The mattress stitch can be used for both crochet and knitting, too! Even if you are a beginner knitter, there’s no reason why your beautiful hard work shouldn’t look as polished as possible! I’ve included a detailed video as well as a step-by-step picture tutorial—stitching together both garter stitch as well as knit stitch!— to assist you in learning this invaluable skill. Hopefully I’ve encouraged you to give it a try! Obviously, YOU are the boss of your own knitting, and you can use any seaming method you prefer in the pattern. ;)

  • Gauge: Obtaining gauge is not of dire importance when knitting a pillow, but it’s such an important part of a yarn crafter’s skills toolbox, and it would be so disappointing to spend so much time knitting a beautiful pillow only to discover it doesn’t fit your pillow form! Take the time to check your gauge.

    Gauge for this pattern: 16 stitches across X 28 stitches tall (rows) in a 4” X 4 “ square.

  • Finished size laid flat before stuffing / inserting pillow form: 15” X 15'‘

AJKSolitudeWIP6.JPG

Cast on 120 stitches using the long tail cast on method. Be sure to leave a decent amount of yarn length on the tail for easy seaming later on!

Join your stitches in the round and place your stitch marker.

For your first row, knit all stitches around (120 stitches) and slip your marker.

For row two, purl all stitches around (120 stitches). I know, I know it seems like a lot of purling! I use the continental method, and 1000% recommend learning to purl continental, but I know so many lovely knitters who enjoy purling english style, too! Because we are knitting in the round, which eliminates making a seam all the way up the side of our pillow, we create that crazy-good-squishy garter stitch texture by knitting one row, then purling the next. Knit a row, purl a row, for 32 rows total. It’ll go by in a flash, i promise, and you’ll feel so good about your amazing purling skillz once you’re finished. ;)

So knit row 1, purl row 2, and repeat this pattern for 32 rows total (you’ll end on a purl row). Take a second to measure your work—it should be measuring about 15” wide when laid flat (this will stretch to 18” or 20” once you insert your pillow/fiberfill stuffing!). It’s ok if it’s a smidge wider than 15”…it’s a pillow! Not the end of the world…or coronavirus, right?? ok, I’ll stop….

AJKSolitudeWIP4.JPG

Hold up a second: YOU DID IT! YOU FINISHED THE GARTER STITCH PART! :::tiny party::

:Now we’re ready for our first color change, and entering the lovely land of those yummy stripes!

Row 33: Change to Color B (the creamy white color in my example), and knit all stitches around (120 stitches).

For rows 34-40, knit 7 more rows of Color B (so you should have eight rows total of Color B). Slip marker, and change to Color A (the charcoal color in my pic).

Row 41: Purl all stitches around, slip marker, and change back to Color B (whew, that wasn’t too bad, right?)

Just continue in this pattern of 8 rows of knitting in Color B and one row of purling in Color A for five more times. You’ll have six total sections of knit and purl stripes, or 54 rows of stripes. (86 rows total including your garter stitch section at the bottom). You should end on a purl row.

Row 87: Slip marker and change to Color B. Knit all stitches around (120 stitches).

Rows 88-106: continue knitting all stitches in the round (120 stitches per round).

Bind off all stitches. Yay! You’re almost there!

AJKSolitudemattressseam9.JPG

ALright, let’s stop really quick and take another measurement check. You should still be measuring about 15” across, and 15” tall. if it’s not exactly 15” it’s OK! You just want your pillow to be approximately the same length and width to create a square, and an inch or two smaller than your pillow form (if you’re stuffing your pillow, this isn’t a big deal, just make sure your pillow is square).

Let’s seam the bottom edge!

Again, I LOVE the mattress stitch. It creates the most professional, polished join between knit rows and I’m just kind of obsessed, ok? I know that the whip stitch method can seem really attrctive after all that knitting in the round, but just try it! You’ve put in so much work and used gorgeous Furls Merino yarn…your pillow deserves a beautiful finish!

I want you to try it SO MUCH that I created a little how-to video for seaming the garter stitched rows together:

AJKSolitudemattressseam10.JPG

Ta-Daaaa! You did it! Look at that beautiful seamed pillow booty. Spectacular!

Now it’s time to seam the top of the pillow…which means…STUFFING TIME!

AJKSolitudemattressseam7.JPG

Here’s where you can either insert a pillow form, or again, you can also stuff your pillow with fiberfill stuffing! I recommend placing a clean pillowcase you no longer use inside the Solitude pillow once it’s knit up, like a liner, and then stuff your pillow with fiberfill! Simply flip down and tuck in the excess pillowcase once the Solitude pillow is full.

To stitch up the knit stitched rows at the top of the pattern using the mattress stitch, you’ll use the same technique I demonstrated in the video above, but this time we won’t be looking for the “bands” under each set of v’s. I’ll show you:

AJKSolitudemattressseam6.JPG

Leave a long tail after binding off your stitches (Also: ignore my witch hands in the picture). Thread your tapestry needle with your long tail.

AJKSolitudemattressseam5.JPG

Find the first knit stitch right above your cast off edge. It’ll be a cute little “V” stitch—we will be using the two “legs” of the V to stitch up our top edge.

Insert your needle underneath the two legs of your first knit stitch beside the long yarn tail. Pull through, but not tight! Leave a little looseness in the seam—we will tighten that up in a bit.

AJKSolitudemattressseam4.JPG

Find the corresponding knit stitch on the opposite side of your cast off edge, and insert your needle under the two legs of that first knit stitch (see pic above). Pull yarn through, but again, not too tight.

AJKSolitudemattressseam3.JPG

Continue sewing the next knit stitch on each side of the pillow, back and forth, for a couple inches. I like to tighten as I go across my work to keep my stitches even. So here’s the magical part…Ready??

Hold your yarn tail with one hand, and the edge of the pillow with the other. Pull gently……..

AJKSolitudemattressseam2.JPG

…and Voila! Magic! Isn’t that the most satisfying experience?! I can’t even stand it sometimes. Continue the mattress stitch across the pillow, tightening the seam every few inches. Finish off.

AJKSolitudemattressseam.JPG

Gah! The gorgeousness! I can’t! Can you tell I love order and symmetry? ;)

The next step is definitely not a requirement, but I hit my newly-stuffed pillow with a little steam on both sides. The stitches just lay so nicely against the pillow, and the seams soften up a bit. Again, totally not necessary…but so polished!

Congratulate yourself on making a beautiful, chic home decor piece that will hopefully bring joy and comfort to your little nest.

AJKSolitude2.JPG

“One can be instructed in society, one is inspired in solitude.” - Gary Gilmore

“Then stirs the feeling infinite, so felt in solitude, where we are least alone.” - Lord Byron

Solitude is the great teacher, and to learn its lessons you must pay attention to it.” - Deepak Chopra

__________________________________________________________________________________________

Thank you for choosing to come on this home decor refresh with me! I hope you find solitude and joy as you stitch.

For those of you who like to read a traditional knitting pattern, I’ve included that below:

Definitions: K = knit, P = purl, SM = slip marker

Using the long tail cast on method, cast on 120 sts in Color A, join in the round. Place Marker. Leave a long enough length of yarn for a yarn tail to seam the bottom of the pillow

Row 1: K all sts, SM (120).

Row 2: P all sts, SM (120).

Row 3 - 32: Repeat rows 1 - 2, alternating K and P rows to create the garter stitch (120). SM. Change to Color B.

Row 33-40: K all sts, SM (120). Change to Color A.

Row 41: P all sts, SM (120). Change to Color B.

Rows 42 - 86: Repeat Rows 33-41 another 5 times, for a total of 6 repeats (54 rows total for this section) (120). SM. Change to Color B.

Row 87: K all sts, SM (120).

Row 88 - 104: repeat row 87 (120). Bind off, leaving a long tail for seaming.

Using the mattress stitch and the length of yarn of Color A from cast on, stitch bottom of the pillow. Finish off.

Insert 18” X 18” or 20” X 20” pillow form, or stuff your Solitude pillow with fiberfill polyester stuffing.

Using the mattress stitch and the remaining yarn from bind of in Color B, stitch top of pillow closed. Finish off.

And you’re done! Thank you for all the love you’ve shown the #AJKSolitudePillow on Instagram, and please tag me when you’ve finished your own wall hanging! I am @addisonjamesknits on Instagram.

You can also contact me at addisonjamesknits@gmail.com with any questions you might have; remember to check out the video tutorials as well!

FREE Crochet Pattern: The AJK Elysian Crochet Wall Hanging

Free Crochet PatternsRachael JunComment
IMG_20200205_101618_195.jpg

Elysian | pronouncination: i-’li-zhen | Adjective; Blissful, Delightful; often describes a blissful state.

Want to know a couple more things that are delightful? Free crochet patterns and simple pieces that sell like hotcakes at markets and craft fairs. Done and Done, my crochet friends. I hope you’re entering a blissful state, because I’m dropping the easy crochet pattern for the AJK Elysian Wall Hanging here today!

Blog_4_pic2coral.JPG

Take a gander at that crazy good texture. The blissful combination of slanted puff stitches and the magic of tubular knit yarn combine to create that amazingly squishy, scrumptiously textured yet perfectly minimal look.

Hold up— tubular knit yarn, you say? I promise you’ve seen it before! This ultra-soft and squishy yarn is made in a chainette-style tube of soft jersey, and usually has a bit of stuffing inside. The chainette outsides and fluffy insides create insanely good stitch definition and super fluffy puff stitches! And because I’ve got crafty friends in so many different areas, I’ve worked up this gorgeous wall art in THREE different brands of yarn, so hopefully you can find or order one to whip up your own!

Probably the most popular of the three yarns is Bernat Maker Home Dec, which this boho chic, beautifully-minimal cream wall hanging is worked up with:

IMG_20200205_101618_195.jpg

You can find Bernat Maker Home Dec in many craft stores, or on Amazon here: https://amzn.to/2w8DnDc .

This fantastic coral Elysian Wall Hanging is created in Red Heart Strata, which is almost identical to the Bernat Maker Home Dec:

Red Heart Strata is also found in many craft stores, some Walmart stores, or I found this three-pack for a great price on Amazon (you can make two full-sized wall hangings or three slightly smaller ones with this bulk three pack! Talk about a craft market SCORE!).

You can grab the three pack in coral on Amazon here: https://amzn.to/2SIaqpp .

The third option I’ve made the wall hanging in is Loops ‘n Threads Woolike CHUNKY, usually found at Michael’s craft stores. It’s a similar tubular knit yarn in really pretty colors that creates a gorgeous piece!

IMG_8034.JPG

Let’s get started!

You’ll need:

  • Size 5 bulky yarn, preferably Bernat Maker Home Dec (317 yds/skein) or Red Heart Strata 95 yds/skein), approximately 100-110 yards. I can make two Elysian wall hangings with fringe using three skeins of Red Heart Strata.

  • Size 6.0 / J crochet hook. I’m using my beautiful Furls Crochet Candy Shop hook in the tutorial video! Shop for your own luxury Furls hooks HERE:

  • A rustic stick from your backyard or favorite hiking trail, or dowel rod (for the not-so-outdoorsy)

  • scissors and yarn/tapestry needle

A note before you begin:

  • Be sure to crochet your initial foundation chains LOOSELY! Don’t be worried if your chain looks short for the size wall hanging we are creating in the pattern; the jersey knit yarn will stretch a good amount, and your rows will end up much longer than the initial chain! You want to create a loose foundation for the puff stitches to have plenty of room.

  • When working the SPS, or Slanted Puff Stitch, make sure to pull the loop up to the height of the DC stitch in front of it to ensure your puff stitch has lots of “puff”! If you’re not familiar with this stitch, or you’re a visual learner, I’ve created a detailed video tutorial for you, as well as a step-by-step picture tutorial you can find below. If you’re like me and prefer to work from standard crochet patterns, just scroll to the bottom of this post.

The Slanted Puff Stitch is created using a multiple of three stitches, plus an additional three stitches as a turning chain. If you’d like to make your wallhanging smaller or larger (go big with this one! It’s gorgeous!), simply increase your starting chain to a multiple of 3.

With your 6.0 / J hook, chain 21 sts LOOSELY. Like… l o o s e l y. If you’re unsure if you are a tight crocheter, or just want to know what my definition of “loose” is, watch Part 1 of the tutorial video to see what I mean!

Next, place a DC into the fourth chain from your hook:

IMG_8018.JPG

Now, yarn over (YO) and pull up a loop in the third chain from your hook, right behind the DC you just created. The DC acts as the “stuffing” that you’ll create your Slanted Puff Stitch around. Pull it up TALL (3 loops on hook):

IMG_8020.JPG

YO, and insert your hook back into that same chain you just pulled a loop up in, pulling it up to the height of the DC as before (5 loops on hook). Now YO and insert into the same chain one more time for a total of three times. You will have 7 loops on your hook:

IMG_8021.JPG

YO and pull loop through all seven loops on your hook. Chain 1 to secure your Slanted Puff Stitch (SPS). Voila! Congrats on birthing your first little puff stitch! (she’s so cute):

IMG_8022.JPG

Skip the next chain, and place a DC in the next chain after the skipped stitch:

IMG_8023.JPG

Just like before, locate the skipped stitch right behind the DC you just created. YO and pull up a loop in that stitch (3 loops on hook)—remember to pull it up TALL:

IMG_8024.JPG

YO, pull up a loop in that same stitch (5 sts on hook). YO and pull up the final loop (7 sts on hook). YO and pull through all seven stitches, ch 1 to secure.

You did it! Your two little baby puff stitches might look a tad messy, but keep going! The great thing about this wall hanging and the jersey knit yarn we use to create it is the TEXTURE, which also hides beginner mistakes and tension issues nicely.

Keep working across your foundation chain, skipping the stitch after your DC/puff stitch and placing a DC in the next stitch. Puff stitch around the DC, in the chain behind it, for a total of 9 puff stitches (using 18 foundation chains).

Place a half double crochet (HDC) stitch in the final chain, ch 2. Turn your work.

Ready for the second row? Locate your ch 1 stitch that you used to secure your SPS in the puff stitch below on row 1. If you’re unsure of which stitch this is, watch my video tutorial to see exactly how to find it!

IMG_8026.JPG

DC in the ch 1 stitch from Row 1:

IMG_8027.JPG

Just like before, locate the stitch behind the DC you just made. YO and pull up a TALL loop in this stitch:

IMG_8028.JPG

YO and pull up a loop (5 sts on hook), YO and pull up a final TALL loop (7 sts on hook). YO, pull through all seven stitches, ch 1 to secure:

IMG_8029.JPG

First Slanted Puff stitch for your second row DONE!

Place a DC in the ch 1 st from the next puff stitch in Row 1:

IMG_8030.JPG

Locate the stitch behind the DC you just created.

YO, pull up a TALL loop. Repeat 2 more times (7 loops on hook). YO, pull through all seven loops, ch 1.

IMG_8031.JPG

Continue to DC/Puff stitch across the row, HDC in top of ch 2 from the row before. Ch 2, turn.

You’ve got the pattern down now! Keep going just like this, in this same pattern, for a total of 18 rows. Make sure you always have nine puff stitches in each row!

HINT: I like to s t r e t c h the work out after completing each row to help the stitches settle and keep the edges from pulling.

After you’ve completed 18 rows of Slanted Puff stitches, evenly sc around all four sides of the wall hanging. See the picture below, and check out Part 2 of the video tutorial for a closer look! After you’ve sc around, tie off and leave a LONG tail for attaching to your stick or dowel rod.

Cut 21 pieces of yarn for your fringe. It’s totally up to you how long you’d like your fringe to hang! I cut approximately 14” pieces, which you’ll double over and attach to the bottom of your wall hanging. Check out Part 2 of the video tutorial to see how I attach fringe!

Blog_4_pic3coral.JPG

Now it’s time to attach your beautiful work to a good stick! Thread a yarn needle with the long tail left over from your sc border. loop it around the stick and insert your needle through the sc at the edge of the wall hanging:

IMG_8043.JPG
IMG_8045.JPG

Pull yarn through, loop it around the stick and insert needle into the next sc at the top of the wall hanging.

You may prefer to skip every other sc, or even every three—it doesn’t really matter to the stability of the piece, so choose whatever you like best!

IMG_8046.JPG

Continue across the wall hanging and tie off. Weave in your end (YAY for only one end to weave in!) at the back of the piece.

IMG_8047.JPG

Simply decide how you’d like to hang your gorgeous Elysian, and you’re FINISHED! I like to tie a bit of the yarn to each end of the stick and hang from a nail. You could also hand the piece from the wood, balanced on two nails or pegs. Whatever fits your aesthetic!

IMG_8048.JPG

For all you visual crocheters or beginners, you can find a complete video tutorial of the AJK Elysian Crochet Wall Hanging here:

Standard Crochet Pattern:

AJK Elysian Crochet Wall Hanging

Difficulty: Easy

Stitches used: ch, DC, SPS (slanted puff stitch), HDC, sc.

Special stitch: SPS - After creating DC, YO, insert hook into stitch directly to the right (behind) DC. Pull up a loop, making sure to pull loop up to height of DC (3 loops on hook). YO, insert hook into same stitch, pull up loop TALL (5 loops on hook). YO, pull up a final loop (7 loops on hook). YO and pull through all seven loops. Ch 1 to secure puff stitch.

Ch 21

Row 1: DC in 4th ch from hook. SPS in chain directly behind DC you just created(creating puff stitch around DC). Ch 1 to secure puff stitch. *Skip next chain, place DC in next chain. SPS in skipped ch behind DC you just created, ch 1 to secure. * Repeat from * across row for 9 total puff stitches. HDC in last chain. Ch 2, turn.

Row 2: DC in ch 1 stitch at top of puff stitch from Row 1. SPS in stitch directly behind DC you just created. Ch 1 to secure puff stitch. *Skip next st, place DC in following st. SPS in skipped st behind DC you just created, ch 1 to secure. * Repeat from * across row for 9 total puff stitches. HDC in last chain. Ch 2, turn.'

Row 3-18: Repeat Row 2. Do not fasten off after final HDC in row 18.

SC evenly around work. Fasten off, leaving extra long tail to attach to stick or dowel rod.

Using yarn needle, whip stitch around stick and into each sc at top of your work, securing the piece to the rod. You may prefer to skip every other sc, or even every three, it’s totally up to you!

Cut 21 pieces of yarn, approx. 14'“ long each (or longer, depending on your desired length of fringe) and attach each piece to the sc at bottom of wall hanging.

Voila! You’ve finished your gorgeous Elysian Crochet Wall Hanging!

IMG_8058.JPG

And you’re done! Thank you for all the love you’ve shown the #ElysianCrochetWallhanging on Instagram, and please tag me when you’ve finished your own wall hanging! I am @addisonjamesknits on Instagram.

You can also contact me at addisonjamesknits@gmail.com with any questions you might have; remember to check out both video tutorials as well!

IMG_20200205_101618_195.jpg

FREE Knitting Pattern: The AJK Easy Knit Scarf

Free Knitting PatternsRachael Jun2 Comments
Blog_03_AJKEasyKnitScarfthumbnail-mainpic.jpg

Introducing the first FREE knitting pattern on the AddisonJames Knits blog: the AJK Easy Knit Scarf!

This gorgeous triangle scarf is perfect for a beginner knitter, yet the finished piece is so chic and pinterest-worthy! Knitted using about two skeins of size 6 super bulky yarn and chunky 10.0 mm knitting needles, it works up lightning fast for almost-instant gratification. And hello…PERFECT for craft shows and markets!

For those of ya’ll who are just starting your knitting journey— this beginner level pattern is SO easy, it’s almost too easy to even be called a “pattern”! You’ll only need to be familiar with Casting On (CO), Knit stitch (K), Binding Off (BO), and the Knit Front & Back (KFB) stitch…I’ll even show you how to knit this easy increase stitch in a video!

Grab your size 10.00 mm circular knitting needles (if you have them…if not, straight needles can work, too!). I love using my Clover Takumi Bamboo Interchangeable needles! They’re definitely an investment, but they feel like an extension of my hands now, and i never have to hunt down a certain needle set for my next project! Check them out on Amazon here: https://amzn.to/38QyNYp

Do some stash diving for two skeins of Lion Brand Yarn Hometown USA, A.C. Moore Mega Tweed, or another super bulky size 6 yarn that you’ve been dying to squish. I used Mega Tweed for the scarf pictured in red, and Lion Brand Hometown USA for the beautiful grey tweed in the videos! Grab a three-pack here: https://amzn.to/36yh8TO

Let’s start knitting! If you’re a visual knitter or a beginner, make sure to scroll to the bottom of this post for two helpful video tutorials!

You’ll need:

  • 2-3 skeins size 6 super bulky yarn (2 skeins for scarf, possibly more depending on how fringe-y you want it!)

  • US 15 / 10.0 mm circular knitting needles (16” or 24” cable)

  • One locking (lobster clasp) stitch marker to indicate increase side of work

This scarf starts out unbelievably easy: Cast on ONE STITCH.

That’s right…one stitch. We will be increasing one side of the triangle in the AJK Easy Knit Scarf to create a “right triangle", or one that contains a 90 degree angle and a longer third side. Remember sixth grade geometry and hypotenuse? OK, please don’t… no math is required beyond counting rows, I swear!

Cast on one stitch and then turn your work. Knit an increase stitch called Knit Front & Back (KFB). I love this increase stitch! Simply knit as usual, but don’t pull the stitch off your left needle! Here it is in action:

Now, insert your right needle into the back loop of the stitch that’s still on your left needle as if to knit, and knit that stitch, too.

Blog_3_pic3.jpg

After knitting the back loop off the left needle, slide the stitch off like normal and admire your two stitches you now have created from that one little stitch!

Blog_3_pic4.jpg

I use the long-tail cast on method, so I have an extra “stitch” left on my left needle. For this pattern, I just drop that stitch off my left needle and pull the tail gently to tighten the yarn onto the right needle.

Turn your work, and now just knit across the row of two stitches. Do this two more times, for three total rows of knit stitch (two stitches per row).

……………………I know this is crazy, but that’s it. That’s the four row repeat that you will knit over and over to create your gorgeous triangle!

Weird, right? Magic? I don’t know, but let’s keep going. Like I said, the stitch pattern is KFB the first stitch, knit to end of row, turn. Knit three rows, turning after each row. KFB (increasing by one stitch), knit to end of row, turn. Knit three rows…….into infinity!

(NOT-SO) PRO TIP: After your second increase (row 4), place your locking stitch marker on the side of the increased KFB stitch. You’re probably not nearly as scatterbrained as I am, but I’ve definitely picked up this scarf and added on an increase row on the wrong side more than once before! Attaching your lobster clasp stitch marker to your increase side of the work will help remind you that you’re on the correct side of the triangle for an increase stitch. I move the stitch marker closer to my needles every so often once my triangle starts to grow!

Blog_3_pic9.jpg

Continue on in this pattern for a total of 140 rows, or the desired length you’d like your scarf to be. Remember, your scarf will stretch and grow a bit once it’s completed and blocked! We will also add a few rows to one corner of the triangle to extend the shorter side just a bit, to make it easier to wrap around your neck. The longest side of the triangle (hypotenuse) is the side that will loop around your neck, if you’d like to try it on after reaching 140 rows to see if you’d like it larger. Remember that steam or wet-blocking will stretch the length of the scarf quite a bit— It will also make the drape and squish so much better, too!

You’re in the home stretch! After you’ve achieved the length you prefer, ending on the side you have NOT increased, turn your work. Bind off your knitting until you have 14 stitches remaining at the end of the row, and then knit those stitches as usual. Turn your work, and knit down the row until you reach your bind off. Turn, bind off once (knit two stitches, and using the tip of your left needle, slip the first stitch over the second stitch on your right needle), then knit the rest of the row. Turn and knit down the row until you reach your bind off. Continue in this two-row repeat pattern until you run out of stitches to bind off. Finish off, and you don’t even have to weave in that one little end—just cut it long enough to hide in your fringe!!

Depending on how much yarn you have left in your second skein and how “fringey” you’d like to make your scarf, you might need a third skein for this last step. I was able to create the amount of fringe on the red scarf with only two sekins of Mega Tweed, but needed part of a third skein for Lion Brand Hometown USA (I’m also ALL.ABOUT.THE.FRINGE. You might not require quite as much. Ha!)

Cut sections of yarn in approximately 12”-14” lengths. Divide each length in half, and insert the loop into the edge of the bottom stitch of the triangle. Pull the loop partially through using your fingers or a crochet hook, insert the two ends of the yarn into the loop, and tighten to attach your fringe. I try to alternate adding fringe to the left and right sides of my scarf, working from the bottom of the triangle up, to keep the fringe even. After you’ve added your desired amount of fringey goodness, block your scarf using steam (my preferred method for acrylic super-bulky yarn) or wet block and shape it before pinning and drying.

After you’ve blocked your scarf, give your fringe a little trim if needed, wrap that pile of squishy gorgeousness around your neck and take all the pinterest-worthy pics you can handle!

For those of you who like to read a traditional knitting pattern like me, here you go!

The AJK Easy Knit Scarf

  • 2-3 skeins size 6 super bulky yarn (2 skeins for scarf, possibly more depending on how fringe-y you want it!)

  • US 15 / 10.0 mm circular knitting needles (16” or 24” cable)

  • One locking (lobster clasp) stitch marker to indicate increase side of work

CO: Cast on, st: stitch, K: knit, KFB: Knit Front & Back, BO: Bind off.

Co 1 st. Turn.

Row 1: KFB (one increase). Turn. (2 st)

Row 2-4: K all st. Turn. (2 st)

Row 5: KFB in first st, K. Turn (3 st) *place locking stitch marker in side of KFB to indicate increase side of scarf.

Row 6-8: K all st. Turn. (3 st)

Row 9-140: Repeat rows 5-8, ending on non-increased side of scarf. Turn.

Row 141: Bind off knitting until 14 st remaining. K remaining 14 st. Turn.

Row 142: K to end of row (start of bind off st). Turn. (14 st)

Row 143: Bind off one (knit two stitches, and using the tip of your left needle, slip the first stitch over the second stitch on your right needle = 1 Bind off). Knit all st. Turn.

Row 144-end: Repeat Rows 142-143 until you have bound off all st. Yay! Fringe time!

Cut lengths of yarn approximately 12-14” long, fold each length in half and attach to shortest two sides of the triangle (remember the longest side will be the side that you wrap around your neck—don’t add fringe to this side!)

And you’re done! Thank you for all the love you’ve shown the #AJKEasyKnitScarf on Instagram, and please tag me when you’ve finished your own scarf! I am @addisonjamesknits on Instagram.

You can also contact me at addisonjamesknits@gmail.com with any questions you might have; remember to check out both video tutorials as well!

Here’s Part 1 of a short video tutorial for you visual knitters out there! This shows you how to cast on and how to knit the Knit Front & Back (KFB) increase stitch:

Here is the Part 2 video of the AJK Easy Knit Scarf, where you can watch how to bind off to create the bottom of the triangle and elongate the triangle edge at the end of the pattern:

Even good decisions carry weight.

AJK Video PodcastRachael JunComment

Hi, loves!

Blog02thumbnailvid.jpg

Even good decisions carry weight.

Have you ever heard that before? I’ll say it again. Even GOOD DECISIONS carry weight. Are you beating yourself up with worry, anxiety, or guilt over a looming decision, even if it's something that will only improve your life, family, or health? On the other hand, are you seemingly drowning in a dark depression this January, and feel utterly unable to take even the next step towards a decision you want to make?

Grab a cup of coffee, pick up that knitting you’ve been longing to work on, click on the video below and listen to what's on my heart, and what I've been processing the last couple of weeks. Let’s be like Anna in Frozen, and just do The Next Right Thing.

I hope it helps you.

P.S., Check back next week for the FREE Easy Knit Scarf pattern you saw in my first blog post! It works up crazy fast using super bulky weight yarn, it’s gorgeously chic and cozy, and did I mention….FREE?

Love,

Rachael

https://youtu.be/3rBeOOioyF0

The AJK home for hot messes, trainwrecks, and other yarn addicts: Coming soon!

Rachael JunComment
Blog01pic1.jpg

Hi, beautiful friends! I’m so excited to reveal my little secret experiment I’ve been conducting on ya’ll for the past few months (wink, wink…you knew I was a scientist!) I’ve had so much fun getting to know you on a much deeper, intimate, gritty (a good gritty…pretty gritty?) way through the videos I’ve posted over the past couple of months, and the responses, comments, emails, “me too’s”, and laughs I’ve heard from you have been the most incredible thing I’ve experienced this past year.

I might be selfish, but I WANT MORE! I’ve created a beautiful space, full of whitespace to rest your eyes, laughs to rest your mind, and hopefully words to rest your soul. Please know you and your precious heart, creative hands, and beautiful mind are welcomed and safe here. We’ll keep talking about feeling like a walking disaster, ruining our kids lives one handmade sweater at a time, pretty indie yarn, and my journey through my first completed year of successful therapy—and hopefully, your journey too.

I love writing, and connecting to other people through words and video, but the most amazing part of all of this is the REAL CONNECTION made when someone listens to or reads the words from my heart (or, sometimes, just how I’ve ruined my kid’s life that day), and say “ME TOO! I had no idea…”

Hopefully you’ll laugh (it can be at me, that’s totally chill here), maybe you’ll cry, and you’ll feel supported and seen and heard. I promise there will be beautiful yarn conversations, giveaways, and super-cute, minimalist-chic knit and crochet patterns (for free!) swimming around in here, too.

So whatever you come here for, I hope you’ll continue to join me. Because I truly enjoy and adore all of you. Let’s embrace the suck together, shall we?